How to Apply for a Student Visa to Study Abroad in 2026: The Complete Step-by-Step Guide
How to Apply for a Student Visa to Study Abroad in 2026: The Complete Step-by-Step Guide Planning to study abroad…
How to Apply for a Student Visa to Study Abroad in 2026: The Complete Step-by-Step Guide
Planning to study abroad in 2026? Learn exactly how to apply for a student visa step by step — documents, timelines, costs, common mistakes, and expert tips for every major destination.
The Student Visa Is the Only Thing Standing Between You and Your Dream University. Here Is How to Get It.
You got the acceptance letter. You secured the funding. Now comes the step most students underestimate, and the one that can derail everything if you get it wrong.
The student visa.
For millions of international students every year, the visa application is the most stressful part of the entire study abroad journey. Not because it is impossible — but because nobody explains it clearly enough. Students miss deadlines they did not know existed. They submit wrong documents. They attend interviews unprepared. They wait in silence for weeks, not knowing if their dream is still alive.
This guide changes that.
Whether you are heading to the United States, the United Kingdom, Canada, Australia, Germany, or anywhere else in the world, this is the most complete, honest, and practical student visa guide you will find in 2026. Read it once. Bookmark it. Share it with every student you know who is planning to study abroad.
Your visa is waiting. Let us go get it.
Why Your Student Visa Application Deserves More Attention Than You Are Giving It
Here is a statistic that should stop you in your tracks: thousands of student visa applications are rejected every year — not because the applicants were unqualified, not because their universities were unaccredited, but because of avoidable errors in the application process.
Wrong document format. Insufficient financial evidence. A poorly prepared interview. An application submitted too close to the deadline. These are not complex failures. They are preparation failures — and every single one of them is preventable.
Your student visa is not a formality that follows your university acceptance. It is a separate, serious application process that requires its own research, its own timeline, and its own preparation. Treat it as seriously as you treated your university application, and you will be on a plane before you know it.
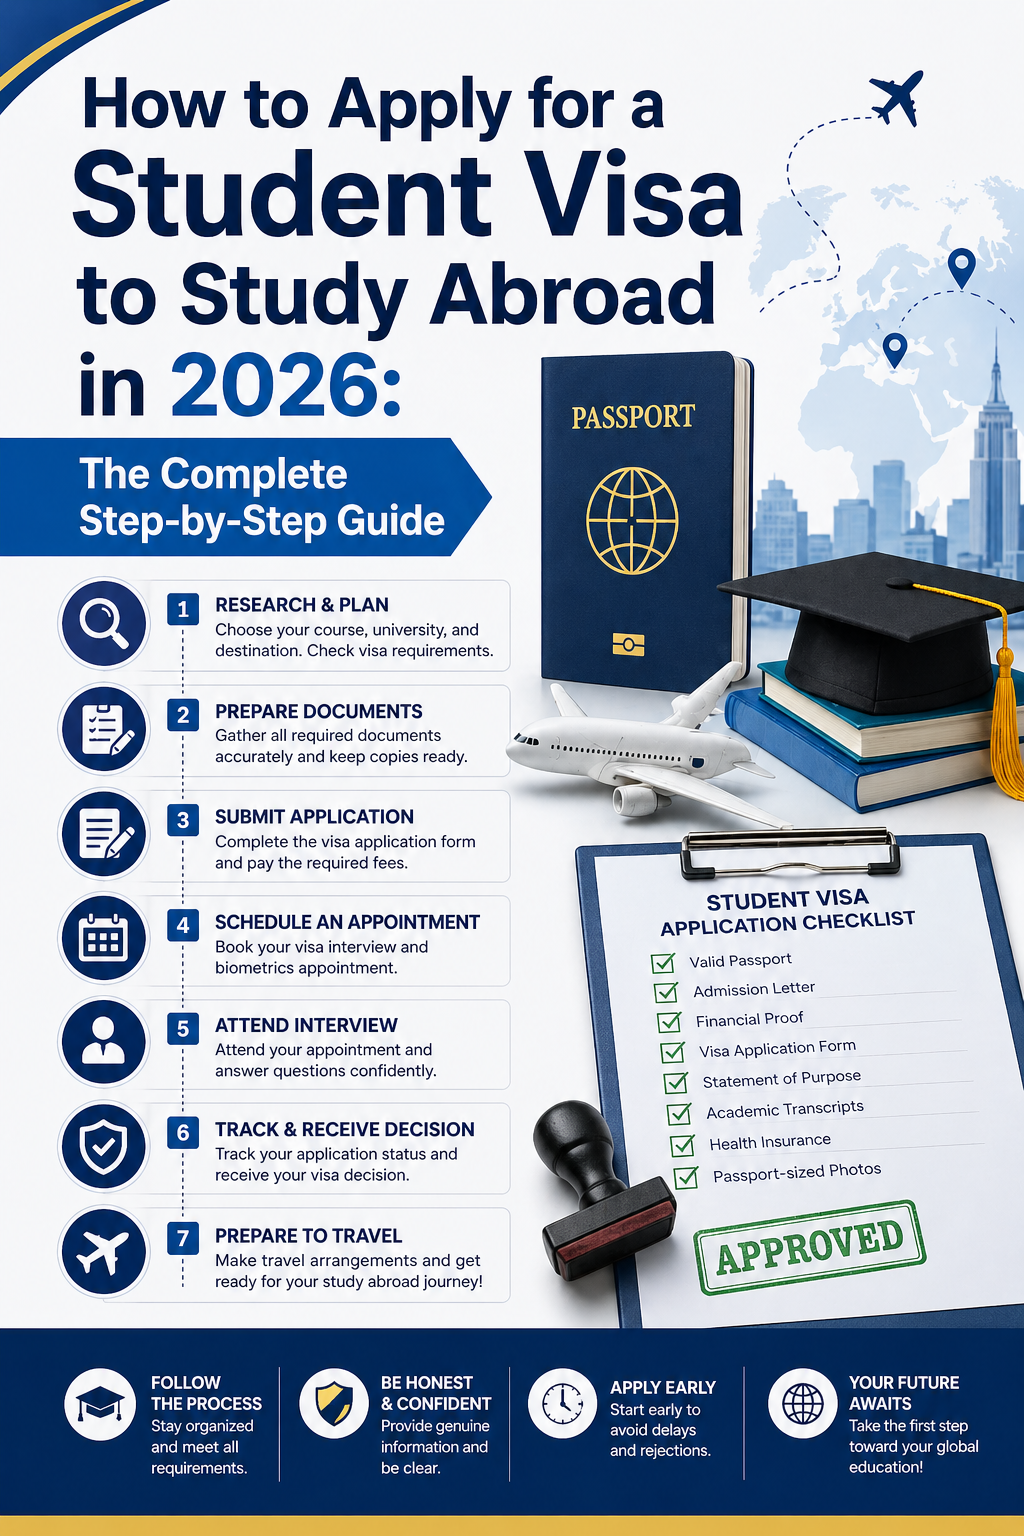
Step One — Understand What Type of Student Visa You Need
Before you fill in a single form, you need to know exactly which visa applies to your situation. Student visa categories vary by destination country, the length of your program, and sometimes even the type of institution you are attending.
Here is a quick breakdown of the most common student visa types by destination:
United States — F-1 Visa The F-1 is the standard academic student visa for full-time students enrolled at an SEVP-certified institution in the USA. If you are attending a US university or college for a degree program, this is almost certainly the visa you need. There is also the M-1 visa for vocational or non-academic programs.
United Kingdom — Student Visa (formerly Tier 4) The UK Student Visa replaced the old Tier 4 system and applies to students aged 16 and over who want to study at a licensed student sponsor institution in the UK. If you are under 18 and studying at an independent school, there is a separate Child Student Visa.
Canada — Study Permit Canada does not issue a traditional “student visa” in the same way — instead, international students apply for a Study Permit, which grants permission to study at a Designated Learning Institution (DLI). In many cases, a Study Permit also comes with a Temporary Resident Visa or Electronic Travel Authorization.
Australia — Student Visa (Subclass 500) Australia’s Subclass 500 Student Visa covers students of all ages who want to study full-time in a registered course at an Australian institution. It also allows limited work rights — up to 48 hours per fortnight during term time.
Germany — National Visa (Type D) for Study Purposes Students from non-EU countries who want to study in Germany apply for a National Visa at the German embassy or consulate in their home country. Once in Germany, they then apply for a residence permit for study purposes.
Schengen Area / Other European Countries For studying in France, the Netherlands, Spain, Italy, and other European destinations, requirements vary by country. Most require a long-stay student visa or residence permit applied for in your home country before departure.
The golden rule: Always verify your specific visa requirement directly on the official government or embassy website of your destination country. Requirements change, and no guide — including this one — replaces official current information.
Step Two — Get Your University Confirmation Documents First
You cannot apply for a student visa without proof that a real, accredited institution has offered you a real place. Before you approach any embassy or immigration portal, you need your official acceptance documentation in order.
For the USA: Your university will issue you a Form I-20 — a Certificate of Eligibility for Nonimmigrant Student Status. This document is generated through the SEVIS system and is essential for your F-1 visa application. Without it, you cannot proceed.
For the UK: Your institution will issue a Confirmation of Acceptance for Studies (CAS) — a unique reference number that confirms your place and the details of your course. Your CAS must be included in your Student Visa application.
For Canada: Your institution will issue an acceptance letter confirming your enrollment at a Designated Learning Institution. This letter is a core document for your Study Permit application.
For Australia: Your institution will issue a Confirmation of Enrolment (CoE) once you have accepted your offer and paid any required deposits. Your CoE is essential for the Subclass 500 application.
For Germany: Your university admission letter serves as your primary confirmation document, along with evidence of enrollment or provisional admission.
Keep these documents safe, backed up digitally, and ready to submit. Losing them causes delays that can push your application past critical deadlines.
Step Three — Gather Every Document You Will Need
This is where most student visa applications go wrong. Not because the documents are hard to obtain — but because students underestimate how many they need, how specific the requirements are, and how long some of them take to process.
Start gathering documents the moment you receive your acceptance. Here is what most student visa applications across major destinations require:
Identity and Travel Documents
- Valid passport — check the expiry date carefully. Most countries require your passport to be valid for at least six months beyond your intended stay. If your passport is expiring soon, renew it before applying.
- Passport-sized photographs meeting the specific requirements of your destination country — size, background colour, recency, and expression requirements vary and matter.
Academic Documents
- Official transcripts from all previous institutions
- Degree certificates or graduation documents
- English language proficiency test results — IELTS, TOEFL, PTE, or equivalent, depending on destination and institution requirements
Financial Evidence This is the single most scrutinised part of any student visa application. Immigration authorities need to be convinced that you can support yourself financially throughout your studies without becoming a burden on the host country.
What counts as financial evidence varies by country, but generally includes bank statements covering the last three to six months showing sufficient funds, scholarship award letters if applicable, sponsor letters if a parent or third party is funding your studies, and proof of any part-time employment or income.
The financial threshold varies significantly by destination. Research the exact amount required for your specific country, course duration, and living location — and make sure your evidence clearly meets or exceeds it.
Health and Character Documents
- Medical examination results — required by Australia, Canada, and some other destinations
- Police clearance certificates — required by Australia, Canada, and increasingly by other countries
- Health insurance evidence — required or strongly recommended for most destinations
Visa-Specific Forms Every country has its own application forms, whether submitted online or in paper format. Complete them carefully, honestly, and completely. Incomplete or inconsistent forms are a leading cause of delays and rejections.
Step Four — Pay Your Visa Fees and SEVIS Fees Where Applicable
Student visa applications are not free — and in some cases, the fees are substantial. Budget for them early so they do not catch you off guard.
USA — F-1 Visa: You will pay the SEVIS I-901 fee ($350 for F-1 students as of 2026) plus the MRV visa application fee ($185). These are paid separately through different portals and both must be paid before your visa interview.
UK — Student Visa: The UK Student Visa application fee is £490 for applications made outside the UK. You will also need to pay the Immigration Health Surcharge (IHS) — currently £776 per year of your course — which gives you access to the National Health Service during your stay.
Canada — Study Permit: The Study Permit application fee is CAD $150. Biometric fees of CAD $85 are also required for most applicants.
Australia — Subclass 500: The Student Visa application fee is AUD $710 for the main applicant as of 2026.
Germany — National Visa: The German National Visa fee is €75.
Keep all payment receipts. You will need them as part of your application documentation.
Step Five — Complete and Submit Your Application
With your documents gathered and fees paid, you are ready to submit. Most major destinations now process student visa applications online, though some still require in-person submissions at embassies or visa application centres.
Key principles for a strong submission:
Be completely honest. Misrepresentation on a visa application — even a minor one — can result in not just a rejection but a ban from future applications. If something in your history is complicated, address it honestly rather than omitting it.
Be consistent. Every document in your application must tell the same story. If your bank statement, your sponsorship letter, and your financial declaration form contain conflicting numbers, reviewers will notice — and they will not give you the benefit of the doubt.
Be thorough. Missing documents are the most common reason for delays. Use the official checklist for your destination country and tick off every single item before submitting.
Submit early. Do not wait until the deadline. Visa processing times vary enormously — from two weeks to several months — and submitting early gives you a buffer if additional documents are requested or if there are processing delays.
Step Six — Prepare for Your Visa Interview
Not every student visa requires an interview — but the most common ones do. The US F-1 visa interview is mandatory for almost all applicants. The UK Student Visa may require one in certain circumstances. Australia and Canada typically do not require interviews for straightforward applications, but this can change.
If you have an interview, prepare for it as seriously as you prepared for your university admission interview. Here is what visa officers are typically trying to establish:
That your study intentions are genuine. They want to know that you are going to study — not to work illegally, not to overstay your visa, not to use the student visa as a backdoor immigration route. Be clear, specific, and enthusiastic about your academic goals.
That you will return home after your studies. This is the central concern of most visa interviews, particularly for the US F-1. Demonstrate strong ties to your home country — family, property, job prospects, career plans — that give you compelling reasons to return.
That you can afford your studies. Know your financial situation cold. Be prepared to explain where your funding is coming from, how much it covers, and what your plan is if costs exceed expectations.
That you understand your chosen program. Know your course name, its duration, the name of your institution, your intended start date, and why you chose that particular program. Vague answers here raise red flags.
Practical interview tips: Dress professionally. Arrive early. Bring every original document plus copies. Answer questions directly and concisely — do not over-explain or volunteer information that was not asked for. Stay calm. Visa officers are trained to read anxiety, but they are not your enemies. They simply have a job to do.
Step Seven — After Your Visa Is Approved
Congratulations — your visa has been approved. But your responsibilities do not end there.
Check every detail on your visa immediately. Verify your name, passport number, visa type, validity dates, and any conditions attached. Errors on visas do happen, and catching them immediately is far easier than correcting them at an airport check-in desk.
Understand your visa conditions. Every student visa comes with conditions — restrictions on work hours, requirements to maintain full-time enrollment, rules about changing institutions or programs, and requirements to notify authorities of address changes. Know them. Violating them — even accidentally — can result in your visa being cancelled.
Know your entry window. Most student visas specify a window during which you must enter the country. Do not book travel outside that window or your visa may be void on arrival.
Register on arrival if required. Some countries — including Germany — require foreign students to register their address with local authorities within a specific time of arriving. Research what post-arrival administrative steps apply to your destination.
The Most Common Reasons Student Visas Are Rejected — And How to Avoid Every One
Insufficient financial evidence. The number one reason for rejection. Make sure your bank statements clearly show sufficient, stable funds — not a sudden large deposit made days before your application.
Incomplete application. Missing a single document or leaving a form field blank can result in rejection or significant delay. Use the official checklist and check it twice.
Unconvincing ties to home country. For destinations like the USA, failure to demonstrate that you intend to return home after your studies is a major red flag. Build your case for home ties explicitly.
Poor interview performance. Nervousness is understandable but preparation is the cure. Practice answers to common questions with a friend or mentor before your interview date.
Applying too late. Processing times are not guaranteed. Applying at the last minute leaves no room for error. Give yourself a minimum of three months for most destinations — and longer for the USA and Australia.
Criminal history not disclosed. Failing to disclose a criminal record that is later discovered is treated as misrepresentation — a far more serious issue than the record itself in many cases. Always disclose and seek advice on how to present it.
Student Visa Timeline — When Should You Start?
Planning your visa application timeline is as important as the application itself. Here is a general guide:
12 months before your course starts: Research visa requirements for your destination. Begin preparing financial documentation. Check passport validity and renew if necessary.
9 months before: Confirm your university acceptance and obtain your I-20, CAS, CoE, or equivalent. Begin gathering supporting documents.
6 months before: Complete your application form. Pay visa fees. Book biometric appointments if required.
4 to 5 months before: Submit your completed application with all supporting documents.
2 to 3 months before: Attend visa interview if required. Respond promptly to any requests for additional information.
1 month before: Receive visa decision. Check all details. Book travel. Prepare for arrival requirements.
A Final Word — The Visa Is a Door, Not a Wall
The student visa process is detailed, demanding, and occasionally frustrating. But it is also completely navigable — for any student who prepares properly, starts early, and approaches the process with the same seriousness they brought to their academic application.
Every year, hundreds of thousands of international students successfully obtain visas and walk through the doors of the world’s greatest universities. They are not special. They are not luckier than you. They simply did the work.
Do the work. Follow the steps. Submit the documents. Show up to the interview prepared.
Your university is waiting. Your future classmates are waiting. The experience that will shape the next decade of your life is waiting.
The only thing left to do is apply.
Ready to take the next step?
Browse our destination-specific student visa guides for the USA, UK, Canada, Australia, and Germany — and download our free student visa document checklist to make sure you never miss a thing.
→ Get the Free Visa Document Checklist → Read Our Destination Visa Guides → Book a Free Study Abroad Consultation